Produced by
Patti Moreno
Contributor to:


How to Build a Chicken Tractor
Why is it called a chicken tractor? I’ll tell you why - A chicken tractor is kind of like a tractor in that it’s a movable structure that’s easily moved around in your garden allowing you to choose which areas of the garden need fertilizing and/or cleaning up. A chicken tractor works similarly to an electric tractor is that it goes where work needs to be done.
Chickens are awesome at cultivating soil with their sharp-clawed feet and while they’re at it, they are also feasting on everything green and catching bugs and leaving deposits of their nitrogen-rich manure. The digging and scratching action will incorporate rich manure into the soil, making the soil perfect for plant growing.
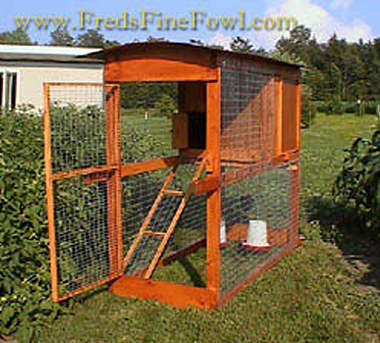
The most light weight and efficient chicken tractor is made from a wood frame with chicken wire around the sides and the top to allow for freedom of movement and fresh air to come in. Never put mesh wire on the bottom of the tractor because the chickens need unobstructed access to the soil. I always suggest adding doors for easy access to feeding as well as moving the chickens in and out. You will see that I have added a tarp to the top of the tractor which will provide shade. In the video, I show you how to make my version of a chicken tractor that fits into a raised bed. I house my chickens on the raised bed once all of the vegetables have been harvested for the year. They live on the raised bed for about 1 month then I move them to another raised bed in my garden. The raised bed that the chickens were in is allowed to lay fallow for 3 months then it’s ready for planting.
All you’ll need to build my style chicken tractor is lumber, 19 gauge Hardware cloth, screws, washers, a tarp, a hand saw or chop saw and a screw gun!
Getting Started: The Basics
You can do this! Building your own raised bed is a somewhat ambitious project, but it is very doable and if I can do it, anyone can! Spend the next 20 minutes with me and I will show you step-by-step how to build a chicken tractor from scratch (pardon the pun). You can build your own lightweight tractor so that one person, like you, can easily move it around the garden.
The lumber that I use is 2x3 untreated pine wood. Pre-drilling holes before you begin to assemble the cage helps to prevent the wood from splitting and makes screwing the wood together easier. I recommend that you start to assemble the back of the cage first. You would use the same type of screws that you used building your raised bed. In addition to the 2X3 pieces of wood, you will also need some strapping pieces which are very thin pieces, that you will see, provide the “seams” of structure. Once you have established the overall shape and dimensions for the tractor you could start to assemble the doors and just set them aside. Watch me.
- Measure the inside of the raised bed so that your chicken tractor will fit into it
- Pre-drill your holes so it is easier when you are putting it together and to prevent splitting
- Lay out all of your pieces on the ground so you can see the dimensions of what you are building
- Measure the sides to know where you will put your door. (I recommend a front door and a side door – more on that later)
- Never use pressure treated wood when animals are involved. Animals tend to chew on wood and you don’t want them to ever ingest the chemicals used in treating wood.
You know the saying, “measure twice and cut once.” So make sure your measurements are correct!
Framing and Making the Doors
Next in this video I explain the importance of having two doors in your structure for easier access to feeding.
- Write down your measurements
- Make sure your strapping is flush with the main pieces of the structure…
- Put your side door closer to the back
- Make a roost for your chickens. They will love it!
Voila!
Well my chicken tractor is almost done. Once the framing is complete, all that’s left to do is “skin” it with the 19 gauge wire which is 2’ wide. The wire is also known as hardware cloth. You’ll see me run into a little glitch with my strapping – one of the pieces is slightly warped, but I can improve on that once I nail it in.
When your framing is complete, it’s time to put your wire on the frame
Just be aware that strapping is sold in bundles and it is hard to see if one or two of them are slightly warped, but it’s not the end of the world.
Skinning it
Now you see me wrapping the wire around the entire frame of my chicken tractor. The wire that is buckling at the doorway will be cut later, so the door will also be perfect! Next I prep the roof for the wire with a simple hammer and nails.
- The wire around the door may buckle when you attach the wire, but since you will be cutting it, it will smooth out
- Use washers to easily secure the wire against the frame
- Instead of washers you can use a staple gun, but I like using washers.
Tarping it!
We are in the home stretch! After I attach the wire to the roof I remove the excess wire with my wire-cutters. Then I secure the roof by placing an 8’X6’ tarp on top of it. I secure the tarp by adding another layer of strapping to it, which will “sandwich” in the tarp to make it super secure. The tarp is a little larger than the structure and if you want you can trim it to make it fit perfectly.
- Have a tarp covering that is around 8X6 which will fit perfectly over this tractor
- You’ll need wire cutting scissors for this part
- You’ll also need more strapping
Closing the DOORS on this project!
“4 pieces of wood – make a box and that’s it!”
Which is really all you have to do to make the two doors that I suggest for your chicken tractor; one in the front and one near the back. Once you have put these four pieces of wood together (the box), you will just need to add the wire which is the same process you have been using all along. The last step is adding hinges to the doors which will make them work better as doors. Once you have put them in their perfectly measured space – this baby is done and ready for chickens!
Let’s go outside…
Once outside, the chicken tractor looks great and ready to do what it’s supposed to do. Here are some more tips so you can make your own chicken tractor.
- Don’t forget to buy your hinges!
- Don’t forget to slide a thin piece of wood at the bottom of the door – to give you a “threshold area” so that the door is not brushing against the soil. (see the video)
- Chickens are very efficient at digging up plants and catching bugs but if you let them loose in the garden they will eat everything, weeds and tomatoes.
- Always put fresh water daily in the tractor for your chickens – it’s hot out there!
- The tractor I build in the video can house no more than 8 bantam chickens or 6 regular size chickens comfortably.
- The more grazing your chickens do, they less expensive they are to keep. feed them weeds and kitchen scraps daily.
- Make sure the tractor fits snuggly inside the raised bed, not on top of the edge of the bed.
If you have any more questions on this topic visit my message board on this topic. Register for the forums to ask questions.